Getting started
Last update: 10.03.2026In this section, you will find the following topics to help you get started using Sherlock's API features:
Becoming Acquainted with gRPC
To use Sherlock's APIs, you will need programming experience (gRPC supports over a dozen computer languages) and a familiarity with gRPC as well. If you are new to gRPC, the official website provides a wealth of information to get you started: an overview of gRPC, a quick-start option, tutorials, downloads, and complete instructions for each supported computer language.
If you want to begin with an overview of basic concepts, visit the Introduction to gRPC page. If you would rather dive in quickly and learn by doing, visit their Supported Languages and Platform page and click the programming language you prefer. This directs you to a quick-start guide and tutorials tailored for that language.
As of this printing, gRPC supports the following languages: Android Java, C#/.NET, C++, Dart, Go, Java, Kotlin"/JVM, Node, Objective-C, PHP, Python, Ruby, and Web.
Where to Find the Sherlock .proto Files
All the Sherlock .proto files you need to run the APIs were placed on your
hard drive when you installed the Ansys software (version 211 and later). You
will find the files in the following location (the file path may vary if you
installed your Ansys software in a nondefault location):
Windows: C:/Program Files/ANSYS Inc/v261/sherlock/grpc
Linux: /ansys_inc/v261/sherlock/grpc
The instructions from the gRPC website explain how to implement the .proto
files. Currently, the .proto files included with Sherlock are:
-
SherlockAnalysisService.proto
-
SherlockCommonService.proto
-
SherlockLayerService.proto
-
SherlockLifeCycleService.proto
-
SherlockModelServices.proto
-
SherlockPartsService.proto
-
SherlockProjectService.proto
-
SherlockStackupService.proto
Connecting to the Sherlock gRPC Server
In preparation for using Sherlock's APIs, do the following:
-
For Windows, open your computer's command-line interface and enter the command below (you can copy and paste the text) and press Enter. This will change the active directory to the location of your Sherlock installation. If you installed your Ansys software in a non-default location, modify the command-line accordingly.
cd "C:\Program Files\ANSYS Inc\261\sherlock" -
For Linux, make sure you have updated all users' login startup files as described in the Post-Installation Procedures for Sherlock in Ansys' Linux Installation Guide, 5.1.7. Post-Installation Procedures for Ansys Sherlock.
Now you are ready to connect to the gRPC server using one of the methods described below.
Securing gRPC Connections
Note A project must exist in the Sherlock client for the APIs to operate on the project.
With the release of Ansys product service packs adding enhanced security to gRPC communication, you now have various transport modes for securing gRPC connections. (In the examples shown, port 9090 is selected, but you may specify any of your computer's available communications ports.)
Supported transport modes
-
Mutual TLS (mTLS).
This mode, which works both locally and over the network, allows secure connections using TLS encryption and client/server certificates. It is recommended for production use, especially when transmitting sensitive data. It is the default option if no transport mode is specified. If the optional parameter--certs-diris not specified, it will expect a certs folder in thev261/sherlockfolder.- Windows:
orSherlockClient.exe -grpcPort=9090SherlockClient.exe -grpcPort=9090 --transport-mode=mtls --certs-dir='path/to/certs/folders' - Linux:
or./runSherlock -grpcPort=9090./runSherlock -grpcPort=9090 --transport-mode=mtls
- Windows:
-
Unix Domain Sockets (UDS).
Linux only. This mode allows connections over a local socket file. UDS is only supported for local inter-process communication (IPC) on a machine running Linux. Optional parameters:--uds-idand--uds-dir./runSherlock --transport-mode=uds --uds-id=test --uds-dir=/home/temp -
Windows Named User Authentication (WNUA).
This mode allows secure local connections on Windows machines through user authentication. It is only supported in Windows. It is the default option in Workbench-Sherlock.SherlockClient.exe -grpcPort=9090 --transport-mode=wnua -
Insecure.
This mode allows connections without any encryption or authentication. It is not recommended for production use but can be useful for testing or development purposes.- Windows:
SherlockClient.exe -grpcPort=9090 --transport-mode=insecure - Linux:
./runSherlock -grpcPort=9090 --transport-mode=insecure
- Windows:
Summary of Commands and Parameters
USAGE: SherlockApp [-console] [-sherlockDir dir] [-no3dInit] [-noGUI] [-noUserInit] [-grpcPort=<port>] [-grpcHost=<host>] [--transport-mode=<insecure|mtls|wnua|uds> [--certs-dir=<path_to_certs_dir>] [--uds-dir=<socket_dir>] [--uds-id=<uds_id>] [-wbWorkingDir=<dir>] [project]
gRPC Options:
  -grpcPort        : gRPC port number (required for insecure, mtls, and wnua transport modes)
  -grpcHost        : gRPC host name or IP address (default is localhost; only valid for insecure, mtls, and wnua transport modes)
  --transport-mode : gRPC transport mode (default is mtls)
                     insecure : Unencrypted, unauthenticated communication
                     mtls     : Encrypted, authenticated communication using mutual TLS
                     wnua     : Windows Named User Authentication (Windows only)
                     uds      : Unix Domain Sockets (Linux only)
  --certs-dir      : Directory containing the mTLS certificates (default is ./certs or the directory specified by the ANSYS_GRPC_CERTIFICATES environment variable)
  --uds-dir        : Directory to contain the UDS socket file (default is $HOME/.conn)
  --uds-id         : Identifier to use in the UDS socket file name (default is no identifier)
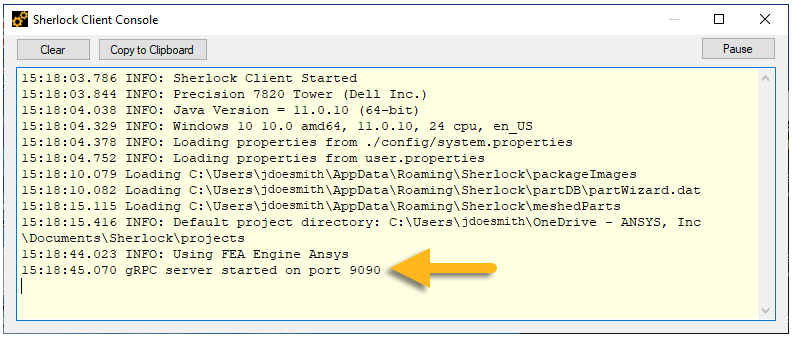
If connection is successful, Sherlock will launch and the Sherlock Client Console appears (Windows), confirming the gRPC server is running on port 9090 or whichever port you selected. For Linux users, the gRPC status appears in the terminal window.
Environment Variables
- This setting makes Workbench use insecure instead of mTLS for Sherlock worfklow:
ANSYS_GRPC_INSECURE_CONNECTION=1 - This environment variable points to a certificate directory besides the default expected at
v261\sherlock\certs:
ANSYS_GRPC_CERTIFICATES=C:\WB_INSTALL\v261\sherlock\certs
Running APIs without the Sherlock User Interface
Sherlock allows you to run APIs without launching the Sherlock user interface. With this option enabled, Sherlock displays no splash screens, progress dialogs, nor console output. Only error dialogs are displayed. This option can be helpful if you wish, for example, to run a batch of analyses quickly.
To suppress Sherlock's user interface, simply add -noGUI to the command
line when launching Sherlock.
Although the console will not be displayed, Sherlock continues to write
console logs to AppData/Roaming/Sherlock/logs (Windows) or the
.sherlock/logs folder of the home directory (Linux). To exit Sherlock, use
the ExitRequest API.
Pre-Generated Python Scripts
Python client-side scripts have been generated and included with the Sherlock installation. To begin using the scripts, do the following:
-
Verify the following software is installed on your computer:
-
Python: Ansys recommends Python version 3.10 or later. If you need to upgrade, download the latest version from python.org/downloads and install according to the instructions on the website.
-
grpcio and grpcio-tools (versions 1.39.0 or later) and protobuf (3.17.3 or later). Install them using the pip command in Python. In the Windows command prompt, enter the following:
pip install grpcio-toolsIf you have them installed already, you can upgrade grpcio-tools and its dependencies using the following command in Python:
pip install --upgrade --upgrade-strategy eager grpcio-tools -
-
In Windows Environment Variables, add the file path to the Python scripts to the Path System variable. If your Ansys software is installed in the default location, the path to the scripts looks like this:
C:\Program Files\ANSYS Inc\v261\sherlock\grpc\python
The API Index gives an overview of all the functions available to you. For each API, you can find an example of its implementation in the section Examples.
Installing and Setting Up BloomRPC (Optional)
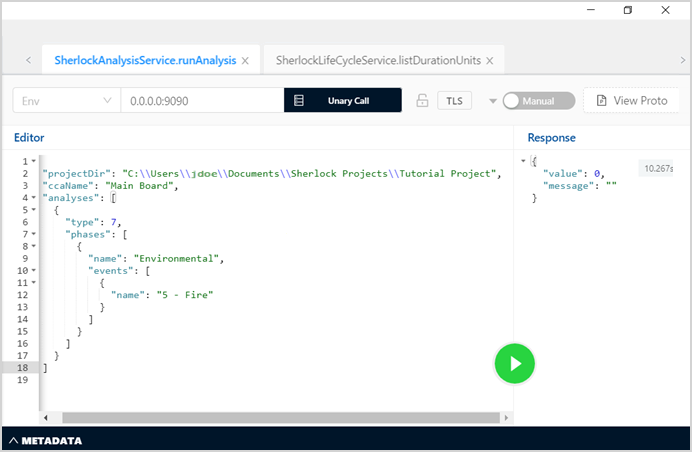
The BloomRPC application is an open source GUI client. It is not required for running Sherlock's APIs, but it does provide a simple way for you to enter an API request and see the response. (See the screenshot below.) This link will take you to the GitHub website where you can download the latest setup file. Once you have installed BloomRPC, follow the configuration instructions below.
Configuring BloomRPC:
-
Open the BloomRPC application.
-
Load the
.protofiles into BloomRPC by clicking on the icon in the Protos panel. This will open a file explorer interface. Navigate to your Sherlock installation and select all the Sherlock
.protofiles. (See the section above Where to Find the Sherlock .proto Files.) -
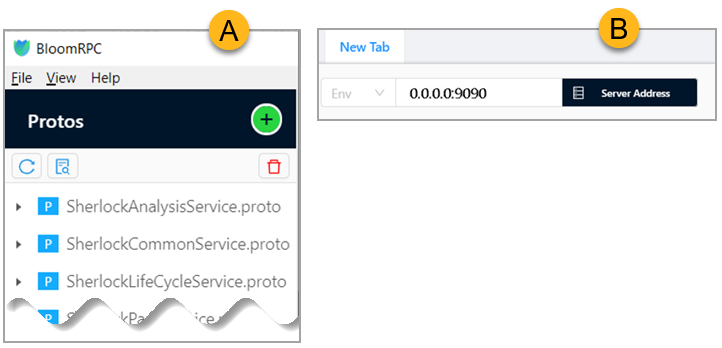
When successfully loaded into BloomRPC, the files will appear in the Protos panel (see A in image below).
-
Connect to the server by entering the server address. In the example below (B), 0.0.0.0:9090 is shown, but use whatever port number you chose in the section above, Connecting to the Sherlock gRPC Server.